

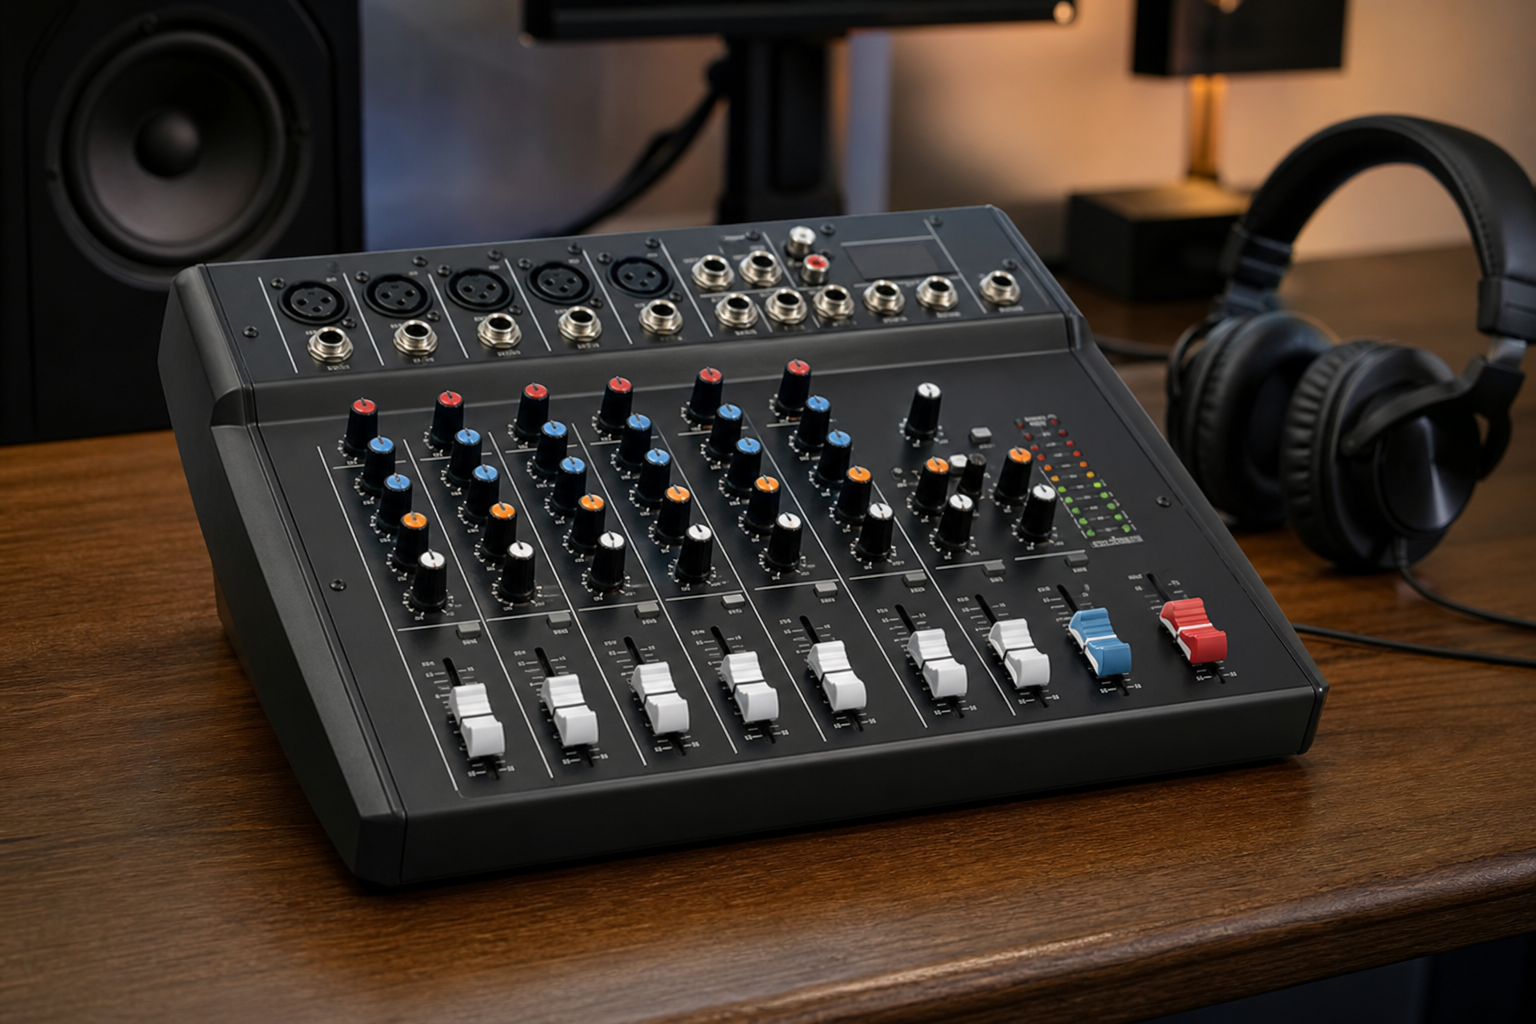
- Understanding Your 8-Channel Mixer Architecture
- Essential Equipment and Connectivity Requirements
- Recommended Accessories for Optimal Performance
- Introducing the Hridz HG8 Professional Digital Audio Mixer
- Step-by-Step Initial Configuration Process
- Input Channel Connection Methodology
- Advanced Signal Routing and Processing Techniques
- Equalization Strategies for Different Sources
- Troubleshooting Common Setup Challenges
- Optimizing Your Workflow for Different Applications
- Maintenance Practices for Longevity
- Expanding Your Audio System Capabilities
Navigating the realm of audio engineering can feel overwhelming, especially when confronted with the myriad of knobs, faders, and connections on an 8-channel mixer. Whether you're capturing pristine vocals for a podcast, orchestrating live performances, or engineering studio-quality recordings, understanding your equipment's nuances transforms your sonic endeavors from amateur to professional.
This comprehensive guide demystifies the 8 channel mixer setup process, equipping you with actionable knowledge that transcends theoretical understanding. From initial configuration to advanced signal routing, you'll discover practical techniques that enhance your audio production workflow.
Understanding Your 8-Channel Mixer Architecture
The foundation of any successful audio setup begins with comprehending your mixer's fundamental topology. An 8-channel mixer serves as the nerve center of your audio ecosystem, consolidating multiple sound sources into a cohesive output signal. Each channel strip functions as an independent processing pathway, allowing simultaneous manipulation of distinct audio inputs.
The input stage accepts various signal types—microphone-level signals through XLR connections, line-level instruments via quarter-inch jacks, and occasionally digital sources through USB interfaces. Phantom power switches, typically labeled as +48V, energize condenser microphones that require external voltage to operate. Gain controls at the channel's apex establish proper signal strength, preventing distortion while maintaining adequate headroom.
Equalization sections grant tonal sculpting capabilities, with frequency bands typically divided into highs, mids, and lows. Auxiliary sends route portions of your signal to external effects processors or monitoring systems, creating parallel processing chains. The channel fader controls volume, while pan knobs position sounds within the stereo field, establishing spatial dimension in your mix.
Essential Equipment and Connectivity Requirements
Before initiating your setup, assembling the proper peripherals ensures seamless integration. Quality XLR cables form the backbone of professional audio transmission, offering balanced connections that reject electromagnetic interference. Quarter-inch TRS cables accommodate line-level devices like synthesizers, drum machines, or audio interfaces.
Microphones represent your primary transducers, converting acoustic energy into electrical signals. Dynamic microphones excel at handling high sound pressure levels, making them ideal for live instrumentation and vocal projection. Condenser microphones capture nuanced detail, perfect for studio applications requiring pristine frequency response.
Monitoring solutions split between studio monitors for critical listening and headphones for isolated tracking. Powered speakers simplify configuration by incorporating amplification directly within the cabinet. Passive speakers necessitate external amplifiers, adding complexity but offering flexibility in system design.
Recommended Accessories for Optimal Performance
- Direct injection boxes for impedance matching and signal balancing
- Pop filters to eliminate plosive sounds during vocal recording
- Microphone stands with shock mounts for vibration isolation
- Power conditioners to protect against voltage fluctuations
- Cable management solutions for organized routing
Introducing the Hridz HG8 Professional Digital Audio Mixer
For those seeking an exemplary starting point in their audio journey, the Hridz HG8 8-Channel Professional Digital Audio Mixer represents an exceptional convergence of functionality and affordability. This versatile console incorporates Bluetooth connectivity, USB interfacing, and DSP effects processing—features typically reserved for considerably more expensive equipment.
The integrated digital signal processing eliminates the need for external effects units, providing reverb, delay, and modulation effects directly within your workflow. USB connectivity transforms the mixer into a multi-channel recording interface, facilitating seamless integration with digital audio workstations. Bluetooth capability enables wireless streaming from mobile devices, expanding creative possibilities for DJs and live performers.
Whether you're establishing a home studio, configuring a mobile recording rig, or designing a performance setup, the HG8 delivers professional-grade signal processing without compromising your budget. Its intuitive layout accelerates the learning curve, allowing beginners to achieve professional results while providing advanced users with sophisticated routing options.
Step-by-Step Initial Configuration Process
Commence your setup by positioning the mixer on a stable surface, ensuring accessibility to all controls and rear-panel connections. Verify that the power switch remains in the off position before establishing any connections—this precaution prevents damaging transient surges through your monitoring system.
Connect your primary monitoring system to the main outputs, typically designated as "Main Out" or "Master Out." These outputs generally feature XLR or quarter-inch TRS connections. Ensure your monitor volume sits at minimum levels before powering the system, gradually increasing to comfortable listening levels after signal verification.
Input Channel Connection Methodology
Begin with Channel 1, connecting your primary sound source. For microphones, utilize XLR inputs and engage phantom power if using condenser microphones. Line-level devices connect via quarter-inch inputs, bypassing the microphone preamp stage. Set the channel fader to the unity gain position, typically marked by a "0" or shaded indicator.
Adjust the gain control while monitoring the channel's peak indicator or LED meter. Proper gain staging aims for healthy signal strength without illuminating the red clip indicator. This critical step establishes optimal signal-to-noise ratio throughout your signal chain, maximizing dynamic range while minimizing unwanted artifacts.
Repeat this process across all required channels, methodically documenting your configuration for future reference. Labeling each channel input creates visual reference points, streamlining workflow during time-sensitive recording or performance scenarios.
Advanced Signal Routing and Processing Techniques
Once fundamental connections are established, exploring advanced routing possibilities unlocks your mixer's full potential. Auxiliary sends create independent mixes for stage monitoring or external effects processing. Pre-fader sends maintain consistent levels to monitors regardless of main mix adjustments, essential for live performance stability.
Post-fader sends link auxiliary levels to channel fader movements, ideal for effects processing that should proportionally track with the main mix. This configuration ensures reverb tails and delay repeats maintain appropriate balance as you adjust individual channel volumes.
Professional audio engineers recognize that proper gain staging represents the cornerstone of exceptional sound quality. Every decision in the signal chain compounds, either preserving or degrading your sonic integrity.
Equalization Strategies for Different Sources
Vocal clarity emerges from attenuating low-frequency rumble below 80Hz while gently boosting presence frequencies between 3-5kHz. Acoustic guitars benefit from subtle mid-range reduction around 400Hz to eliminate boxiness, with high-frequency enhancement above 10kHz adding airiness.
Bass instruments require careful low-end management, balancing fundamental frequencies around 60-100Hz with harmonic content in the 200-400Hz range. Drums demand frequency-specific treatment across individual components—kick drums emphasize 60Hz and 3kHz, snares feature 200Hz body and 5kHz snap, while cymbals occupy the extreme high-frequency spectrum.
Troubleshooting Common Setup Challenges
Audio troubleshooting demands systematic methodology, isolating variables to identify root causes. Unwanted hum typically indicates grounding issues or proximity to electromagnetic interference sources. Separate audio and power cables, avoiding parallel runs that create inductive coupling.
Absent signal requires verification of gain settings, channel assignment switches, and mute buttons. Phantom power must be engaged for condenser microphones, while pad switches should remain disengaged unless managing exceptionally hot signals. Cable integrity testing eliminates faulty connections as potential culprits.
| Symptom | Potential Cause | Solution |
|---|---|---|
| Distorted audio | Excessive gain staging | Reduce input gain and monitor peak indicators |
| Low output volume | Insufficient gain or fader positioning | Increase gain control and verify fader at unity |
| Intermittent dropouts | Faulty cable connections | Test and replace suspect cables |
| Persistent background noise | Grounding loop or EMI | Utilize ground lift switches and relocate cables |
Optimizing Your Workflow for Different Applications
Podcast production prioritizes vocal intelligibility and consistent dynamics. Engage high-pass filters to eliminate proximity effect and room rumble. Compression settings with moderate ratios between 3:1 and 4:1 tame dynamic variations, ensuring spoken word remains present without constant fader riding.
Live performance demands rapid recall and minimal adjustment during execution. Create detailed setup diagrams documenting channel assignments, auxiliary routing, and equalization settings. Soundcheck protocols should verify each input systematically, establishing baseline levels before audience arrival.
Karaoke applications benefit from dedicated vocal channels with reverb effects, creating professional ambiance. Separate music playback channels maintain backing track clarity while vocal processing enhances singer confidence without overwhelming the instrumental foundation.
Maintenance Practices for Longevity
Regular equipment maintenance preserves performance and extends operational lifespan. Clean fader and potentiometer contacts periodically using contact cleaner specifically formulated for electronic components. Dust accumulation degrades connection integrity, introducing crackling and signal degradation.
Firmware updates for digital mixers introduce feature enhancements and resolve identified bugs. Manufacturers typically provide update utilities through their websites, accompanied by detailed installation instructions. Backup your current configuration before initiating updates, ensuring recovery options if complications arise.
Cable inspection prevents performance interruptions. Examine connectors for corrosion or physical damage, testing continuity with a multimeter. Proper cable coiling prevents internal wire breakage—the over-under technique eliminates twist accumulation that causes premature failure.
Expanding Your Audio System Capabilities
As proficiency develops, system expansion accommodates growing creative ambitions. Additional microphone preamps extend input capacity beyond the mixer's native channels. Digital audio interfaces bridge the gap between analog mixing and computer-based recording environments, enabling multi-track capture within digital audio workstations.
Outboard effects processors supplement built-in DSP, offering specialized algorithms for compression, equalization, and spatial effects. Hardware inserts interrupt the signal path, allowing surgical processing of individual channels with dedicated equipment. This modular approach creates scalable systems that evolve alongside your developing expertise.
Mastering your 8-channel mixer transforms technical knowledge into creative expression. The principles outlined here establish foundational competence, while experimentation and practical application cultivate intuitive understanding. Your journey from beginner to professional audio engineer accelerates through deliberate practice, informed by these systematic methodologies.





Share:
Video Audio Setup: Essential Equipment for Content Creators 2026
Setup Portable Lighting: Quick Guide for On-Location Shoots